Large format cameras were the first type to be used in photography when it first started. The traditional cameras used were Hasselblad, Pentax, Rollei and Kowa. One of the main advantages of large format is that the images created are of much higher resolution because the negatives that are taken are 4x5 inches. Wheras in today's compact cameras the film is 35mm. A larger negative meant that the images would have more pixels and would then be better quality when they were printed on a bigger scale. The downside to large format cameras were that they were very heavy and couldn't be very easily moved around and taken on location. This meant that photographers often had to stay in the studio and always have the same background on their photographs. Another downside to large format cameras is that they took a long time to expose an image. This meant that the subject had to stay very very still for a long time. Often the camera would expose an image for a few minutes each time, and models would have to be propped up with things behind them that the camera couldn't see to avoid them moving and making the image blurred.
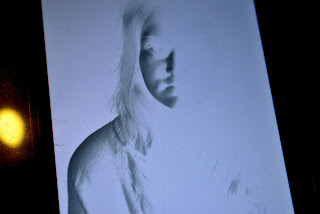
This was the first negative that I took using a Large format camera. I took this on a 5x4 camera and exposed it directly onto light sensitive paper rather than onto a film negative. I loaded up the paper in a dark bag and inserted the dark slide to that no light could get to the paper. I then placed my light sensitive paper into the camera and positioned my subject in front of a white board. There was no added lighting or flash for this shoot, just the available lighting in the room that we were taking the photograph in. I exposed this image for around 8 seconds. I think this is a very long time for my model to keep completely still so my image has come out blurred. This is a disadvantage to shooting with a large format camera, because people can't stay still for that amount of time. Years ago, people used to be propped up with hidden sticks and other things so that they could stay still for the amount of time it took to take the photograph.
Here is my first developed print of my image. In the darkroom, I took the original exposed paper out of the slide holder and placed it on the enlarger. I then placed another piece of light sensitive paper on top of it and exposed them both to light for around 20 seconds but this is how the image came out - very pale and my model doesn't have any features. I think this is because we were making a paper to paper print, which meant it was a lot harder for light to get through.
I then decided to expose my contact image for around 60 seconds, which is how I achieved this image. It is a lot darker than the previous image since it had 3 times as much time to expose. I still don't like it very much because it is blurry. I like the effect of the image and how it looks like a really old photograph. But I think if I was to do this again I would definitely try and prop my model up in some way so that they were still and would come out in focus when I developed the image.
This was my second attempt at using a large format camera. This time I used film rather than just light sensitive paper and I definitely prefer the result. It looks more like a photograph whereas the other one looks sort of like a photogram. To take this image we all worked together as a group and all had different jobs when it came to taking the photograph. We took a range of different photographs and all did a different job each time, however, this is unfortunately the only one that came out ok. I think for the others we must have been loading the film wrong, as they all came out black. To create this image, Sam modelled for us, and I set up the lighting up by having one key light positioned at the left of the subject, only lighting one side of Sam's face creating a moody image. Natalie then took a light reading which determined which settings we would need. We took this image at


No comments:
Post a Comment